This option offers the standard screen for bibliographic searches.
After performing a search the screen for viewing a reservation queue is offered, as in AFO 422.
When a reservation is placed for an item that is on the shelves in a library, the reservation will appear on the Picklist of the library that has the item or items. If multiple copies of one title (a single bibliographic record) are available at a single location they will all be listed on the picklist because they might have different shelfmarks or item categories.
If a reservation is placed on items in multiple locations, the reservation appears on the picklist of all the locations that have one or more copies on the shelf. When one of the libraries finds an item to satisfy the reservation and traps it, the reservation will be removed from all the picklists on which it appeared.
If there are multiple reservations for a title where there are multiple copies at a location, the picklist will display the reservations up to the maximum number of copies that it has on the shelves.
For example, if there are five reservations for the title "New book" and the Central Library has three copies on its shelves, only the first three reservations on the waiting list will appear on the picklist. If the Branch Library has only one copy, they will only see the first reservation on the waiting list on their picklist. If the Branch Library finds a copy first and traps it, the reservation will be removed from their picklist because they no longer have copies available on their shelves. The Central Library picklist will automatically be refreshed to show reservations for the second, third and fourth reservations on the waiting list, because they still have three copies available.
Picklists are sorted by date and by location.
You can maintain picklists on a daily basis (where the current date is default), but it is also possible to combine the current picklist with previous picklists.
What is shown on this screen also depends on parameter settings in AFO 481 – Circulation parameters – Reservations – Miscellaneous.
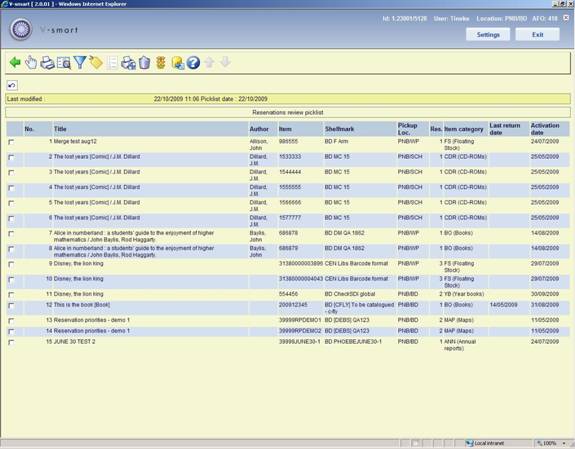
After choosing this option an overview screen will be displayed:
This screen shows only item details for copies that are available at your current location.
The Reservations column shows the number of reservations for each title.
You can sort the display of the records by clicking the column heading. For example you can sort by shelfmark and then print the list to search your library shelves. Any of the columns can be used to sort the display.
The header pane shows the Last modified date and Picklist date.
Last modified date: date and time when reservations were last added to the picklist, or removed from the picklist because they were trapped or cancelled.
Picklist date date of the picklist.
Any reservations that remain outstanding (not trapped) on today's will automatically appear on the for the following day.
Reservations on appear on today's picklist when they reach their active date.
Title: The title of the work.
Author: The author of the work.
Item: The barcode of an item that is available to be trapped to satify the reservation.
Shelfmark: The shelfmark of the item.
Pickup loc.: The pickup location as it was entered on the reservation.
Res.: The number of reservations outstanding for the title.
Item category: The item category.
Last return date: The date the item was last returned.
Activation date: The date the reservation was activated.
: this takes you to an overview of the selected reservation. From this screen you can view the details (as in AFO 415) or go to the reservations queue (as in AFO 422).
: this uses standard output procedure and can be used to print the list of items that have not been picked up, for example.
: gives access to the full bibliographic record in Read Only mode.
: gives access to the full bibliographic record in Read Only mode.
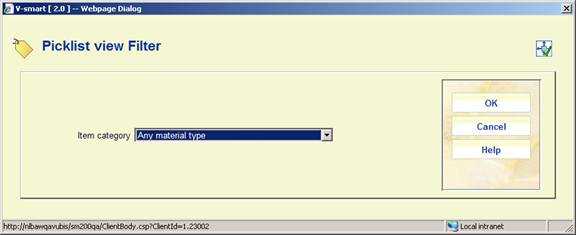
: to limit the display to a certain item category (only categories shown on screen are available in the dropdown list):
: When items have been found on the shelf you must trap them. See section 418.6.1.
: This option takes you to an overview screen with picklists. Optionally you can combine picklists from other dates here.
: Select an item from the list and choose this option, the standard form for output is displayed. You can use this to print the selected item.
: choose this option to delete the selected item from the picklist. The system will prompt for confirmation.
: this option is similar to the Modify status option in AFO 423. You can use this to assign a missing status (in case the item turns out not to be on the shelf after all).
: With this option you can generate a special savelist which can then be used to compare with items on the shelves (stocktaking). See the help of AFO 424 for an introduction.
The items that appear on the picklist are items for which a reservation was made whilst they were not on loan. Once you have picked the items from the shelves, you must trap them in order to activate the reservation.
Click on .
The Picklist trap reservations screen is displayed:
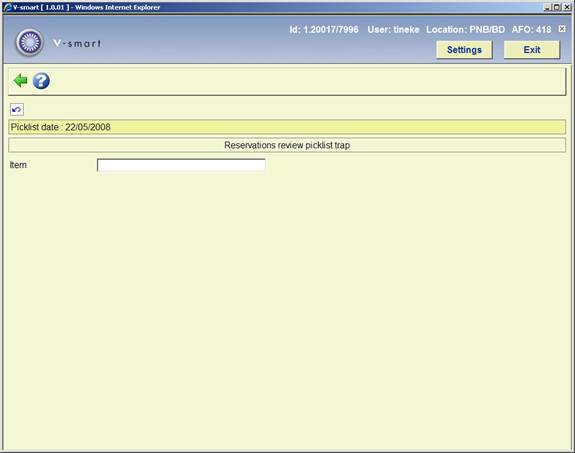
Enter the item barcode of the item(s) you want to trap. A reservations message is shown:

Either just acknowledge the message or click , to print a reservations slip.
Return to the Reservation review – picklist screen. The items should no longer be on the list.
See also the Help for AFO 618 – Service points maintenance, for more information on the concept Reservations Messaging Subsystem.
This shows the reservations / items selected for your current “service point”. Your service point is defined in a user setting for each login id from AFO 611.
If this has not been defined for a user, then they will not have access to the reservations messaging picklist view. The following message appears:

More than one service point may be assigned to a staff user; if so, then they will be asked to identify for which service point they are working on when entering the messaging picklist.
The reservations message view of the picklist is very similar to the regular picklist view.
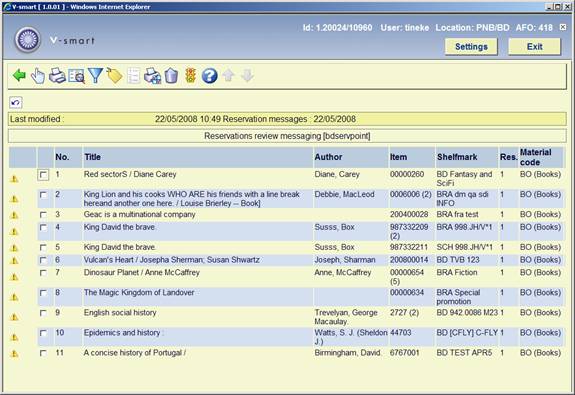
The following is different :
· A warning triangle is displayed against those entries which have not yet been printed.
· In addition to showing the item barcode “chosen” by the messaging processing, the system shows the number of possible barcodes apparently available for the service point. This acts as a warning that the staff member should attempt to pull the chosen item from the shelves.
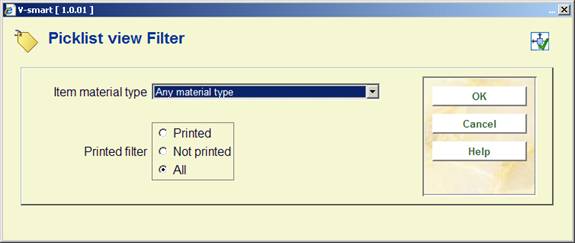
· Filter – it is possible to filter the displayed reservations firstly according to the item category for the items selected (e.g. to limit the display to DVDs only), and secondly by whether printed or not.
· The printing option allows for the printing of one or more selected lines.
By selecting a line, you are taken to the borrower list for the selected item. It is possible to display ALL the reservations for this title by selecting the option.
The other options are the same as those on the picklist overview screen.
Note
There is one further change to the behaviour of the picklist from the messaging view. Normally, when trapping an item it will be selected for the first borrower in any reservation queue; however, in the reservations messaging context, the item will be trapped for the borrower shown. Since the reservations were originally processed in priority order, there is almost certainly going to be another item selected for the first borrower on the queue and when that one is trapped it will be saved for the first borrower.
See also the Help for AFO 618 – Service points maintenance, for more information on the concept Reservations Messaging Subsystem.
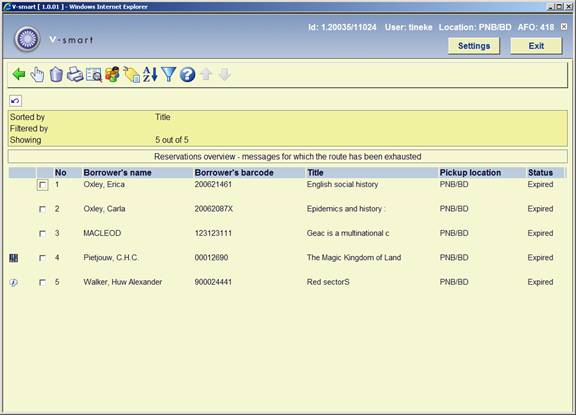
This option allows you to view reservations messages for which all service points have been consulted and no action was taken to select the item.
After choosing this option an overview screen will be displayed:

This displays a list of reservations for which all the branches on the route list have been contacted and for which the messaging has gone around the loop the required number times. Reservations in this state are displayed for which the placing location is the same as the current location for the workstation.
The display is identical to that for the reservations overview (see section 4.17.3), except that the option has been cut down to reflect the more limited range of sensible choices. In addition an option to display ALL reservations in this state, regardless of the current location is offered.
There is an option , to be used when staff are satisfied that the message has been fully dealt with, without affecting the progress of the outstanding reservation which may remain active on items still on loan.
After selecting this option, you can apply an action to the selected message:
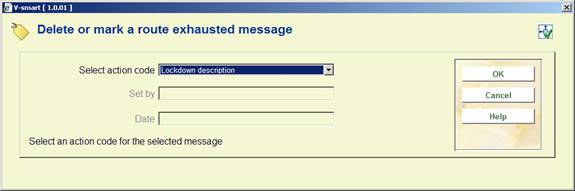
Select action code: Select the required action code form the dropdown list.
Set by: entered by the system (see below).
Date: entered by the system (see below).
If the message is not subsequently hidden, then the designated icon is shown against the message to indicate its current state of play. For example, the “lock” in the example screen has been used to indicate that the reason for this reservation appearing in the list has been investigated.
If you use the option for a message already marked, then the system will show the current status together with the name of the user who set the action, and the date and time set:

You may change the action associated with a message, but you may not remove it. If you need to do this, then it would be necessary to create an action code such as “Re-opened” to highlight this condition.
Note
The option is NOT available if the "Show all locations" filter is turned on.
· Document control - Change History
|
Version |
Date |
Change description |
Author |
|
1.0 |
May 2008 |
creation |
|
|
2.0 |
June 2009 |
new (filter) options on overview screen; new columns and option on picklist screen; textual improvements |
|